If your Electric Dryer does not have Power to the Control check the following
Power From The House
Check to see whether there's power getting to the dryer. Is it plugged in? If you plug something else into the outlet, does it work? If not, check for a blown fuse or tripped circuit breaker.
If the door switch or the door-switch actuator is defective, the dryer won't work and you need to replace the failed component. To test the switch you will need to unplug the dryer. Then pull it away from the wall enough to get access to the back.
 Remove the 2 screws.
Firmly grab the sides of the of the top panel and push back slightly and tip up to remove.
You should be able to look inside and see the switch. You will see the wires going to the switch if you can unplug the wires at a connector above is easiest. Where it meets the control. If there is not a connector you will need to remove the switch.
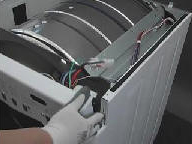
 This will give access to the control panel screws. Remove 1 screw located on each side of the control panel and then the control panel can be swung out of the way. If you disconnect the wiring, take a pic first.
The switch is held in by a screw or screws. Sometimes a plastic tab is all. Remove the screws or tab and the switch will come free. This will give you better access to the wiring.
Testing the electric dryer switch
Visual inspection:
Examine the switch for any visible signs of damage, such as burn marks, loose connections, or a broken switch lever. If you notice any physical damage, it may indicate a faulty switch.
Multimeter test: If the switch appears undamaged, you can use a multimeter (a device used to measure electrical voltage, resistance, and continuity) to check its functionality. Set the multimeter to the continuity or resistance mode. Video on how to use a multimeter.
With the dryer still disconnected from the power source, disconnect the wires from the switch terminals.
Place the multimeter probes on the switch terminals. The specific terminals may vary depending on the switch design. Many switched will be labeled with the c for common wire. Connect one lead to the common wire and one lead to one of the other 2 leads.
Activate the switch by turning it on or pressing the button. If the switch is a push-button type, press it to simulate the on position.
Check the multimeter reading. If it shows continuity or low resistance (usually close to zero), it indicates that the switch is functioning properly. If there is no continuity or high resistance (infinite reading), it suggests a faulty switch. Check both wires to the common wire.
Replacement: If the switch fails either the visual inspection or multimeter test, it is defective and needs to be replaced.
Thermal Fuse / Thermal Cut out
On many dryers, there's a thermal fuse (a heat-sensitive fuse that blows if the dryer overheats) mounted to the exhaust duct inside the back cover panel or behind the front panel. The fuse is about an inch long. It's usually embedded in black resin and mounted in a white plastic housing or is sometimes round and made of metal and plastic. The thermal fuse allows power to run thru it. Anything creating an overload of power could cause this fuse to blow. Some dryers use more than one thermal fuse. They vary in location depending on the model. They are usually located on the blower housing or near the heating element. They are easy to check with a multimeter. Place one test lead on each terminal and you should have a reading of zero if not you will need to replace the dryer's thermal fuse.
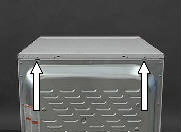
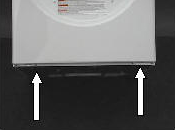
Pull Dryer away from wall to give access.
Then you should see two screws located at back top of dryer (As seen in photo)
Remove these two screws.
Now you will be able to grab the top by the sides and push back panel slightly and lift off.
Now that the top is off.
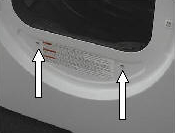
This allows access to the two screws holding your front console on.
At the top usually one on each upper corner you will see a screw. (As seen in photo)
Before removing these screws take a photo of wiring on the back then remove screws.
 If you are removing the console unplug any connectors make sure to have good photo of the wiring.
Now remove the console.
Usually, enough wire to swing out of the way if not removing completely.
 This will give you access to the 2 top screws of the front panel. As seen in photo.
Do not remove these screws yet we will come back to them.
 Best to remove the 2 screws at the bottom of the dryer front panel. You might need to prop up the dryer to get access.
 Next there are usually 2 screws located behind the door on the front panel.
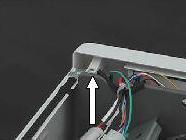
Photograph connector at door switch and light.
Now remove the 2 top screws exposed earlier. Hold the front panel in place as you remove these screws.
Slowly tilt the panel forward and unplug remaining connectors.
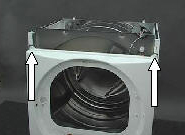
Panel is now removed. The tub is now easily moved so be careful it can fall out on some models.
Remove these 2 screws.
 The Blower wheel housing will be located in the bottom of the dryer. The Thermal Fuse is located on the duct coming from the blower wheel housing.
To Test the Thermal Fuse. Place one test lead on each terminal and you should have a reading of zero if not you will need to replace the dryer's thermal fuse.
The Blower wheel housing will be located in the bottom of the dryer. The Thermal Fuse is located on the duct coming from the blower wheel housing.
To Test the Thermal Fuse. Place one test lead on each terminal and you should have a reading of zero if not you will need to replace the dryer's thermal fuse.
Disconnect the wires:
Gently pull the wires off the thermal fuse terminals. Some thermal fuses have push-on connectors, while others may have screws securing the wires. Make a note of their positions or take a picture for reference.
Remove the thermal fuse:
Depending on the type of thermal fuse, it may be secured with screws or clips. Remove any screws or release the clips to take out the thermal fuse from its housing.
Attach the wires to the new thermal fuse, making sure they are properly seated and secure. Refer to your notes or the picture you took earlier to connect the wires correctly.
Reverse the procedure to Reassemble the dryer:
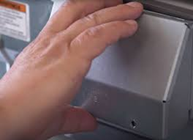 Often the main wiring connection from the house, at the dryer, burns and the connection breaks. If this has happened to your dryer. This often happens because of a loose connection at the power cord. To check the electric dryer wiring unplug the dryer. Pull dryer from wall.
 Remove the access cover on the back. This is where the dryer cord enters the dryer. Look at the connections. If they are burnt you need to replace the power cord (follow link for video) and the terminal block inside the dryer to which the wire is attached. If they are not burnt check for tightness and reinstall. If the wires are burnt it may also indicate and internal problem. After replacing the cord if it pops the breaker seek a quality professional.
To check the Main Control for your electric dryer you will need to disconnect the power to the dryer. Unplug the dryer is best.
Pull Dryer away from wall to give access.
Then you should see two screws located at back top of dryer (As seen in photo)
Remove these two screws.
Now you will be able to grab the top by the sides and push back panel slightly and lift off.
Now that the top is off.
This allows access to the two screws holding your front console on.
At the top usually one on each upper corner you will see a screw. (As seen in photo)
Before removing these screws take a photo of wiring on the back then remove screws.
If you are removing the console unplug any connectors make sure to have good photo of the wiring.
Now remove the console.
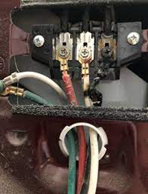
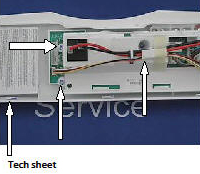 These are the main power wires coming into the control. Referring to the tech sheet set your multimeter to ac volts.
This video will show you how to use a multimeter. Turn power back on see if power is entering the control. If power comes in and the control does not light up replace the main control.
These are the main power wires coming into the control. Referring to the tech sheet set your multimeter to ac volts.
This video will show you how to use a multimeter. Turn power back on see if power is entering the control. If power comes in and the control does not light up replace the main control.
To replace the main control, Disconnect power. Take pics and remove all wire connectors. Then remove screws securing main control down. Reverse the procedure to install.