If your Dryer Has No Light
Check the Following
Light Socket
The light socket can get corroded, or a wire connection can come loose. You will need to remove the top panel to access the housing on most dryers. But first try to remove the bulb. Use a strong flashlight and look into the socket for corrosion. If you do see any replace the light socket. If you do not inspect or replace the bulb. If you do not see corrosion and you replaced the bulb it is likely the door switch. If it is corroded To access the bulb socket on most dryers the top panel will need to be removed. To remove the top panel on your electric dryer
To access the dryer light socket, you will need to unplug the dryer. Then pull it away from the wall enough to get access to the back.
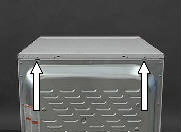 Remove the 2 screws.
Firmly grab the sides of the of the top panel and push back slightly and tip up to remove.
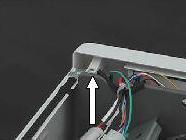
You should now be able to access the dryer light bulb socket. This access varies depending on model.
If your dryer has an interior light, it probably uses a standard 40-watt appliance bulb but check your owner's manual to be sure. If the bulb is good but the light won't come on, check the door switch, which serves two functions: When the door is closed, it turns off the light and allows the dryer to start. When the door is open, it turns on the light and prevents the dryer from starting. To check the door switch in your electric dryer.
If the door switch or the door-switch actuator is defective, the dryer will not work, and you need to replace the failed component. To access the switch, you will need to unplug the dryer. Then pull it away from the wall enough to get access to the back.
Remove the 2 screws.
Firmly grab the sides of the of the top panel and push back slightly and tip up to remove.
You should be able to look inside and see the switch. You will see the wires going to the switch if you can
unplug the wires at a connector above is easiest. Where it meets the control. If there is not a connector you
will need to remove the switch.
 This will give access to the control panel screws. Remove 1 screw located on each side and the
control panel and then the control panel can be swung out of the way. If you disconnect the wiring, take a pic first.
The switch is held in by a screw or screws. Sometimes a plastic tab is all. Remove the screws or tab and the switch will come free. This will give you better access to the wiring.
This will give access to the control panel screws. Remove 1 screw located on each side and the
control panel and then the control panel can be swung out of the way. If you disconnect the wiring, take a pic first.
The switch is held in by a screw or screws. Sometimes a plastic tab is all. Remove the screws or tab and the switch will come free. This will give you better access to the wiring.
Testing the electric dryer switch
Visual inspection: Examine the switch for any visible signs of damage, such as burn marks, loose connections, or a broken switch lever. If you notice any physical damage, it may indicate a faulty switch.
Multimeter test: If the switch appears undamaged, you can use a multimeter (a device used to measure electrical voltage, resistance, and continuity) to check its functionality. Set the multimeter to the continuity or resistance mode.
Video on how to use a multimeter.
With the dryer still disconnected from the power source, disconnect the wires from the switch terminals.
Place the multimeter probes on the switch terminals. The specific terminals may vary depending on the switch design.
Many switches will be labeled with the c for common wire. Connect one lead to the common wire and one lead to one of the other 2 leads.
Activate the switch by turning it on or pressing the button. If the switch is a push-button type, press it to simulate the on position.
Check the multimeter reading. If it shows continuity or low resistance (usually close to zero), it indicates that the switch is functioning properly. If there is no continuity or high resistance (infinite reading), it suggests a faulty switch.
Replacement: If the switch fails either the visual inspection or multimeter test, it is defective and needs to be replaced.
It blows fuses or trips the circuit breaker
Electric dryers use 220 volts or two power lines of 110 volts each. Some components in the dryer need only 110 volts; the heating element requires 220 volts. So, it's possible for one part of the dryer to be fine and another part to have a short circuit. Short circuits can be caused by the heating element, the main power cord, or any other part of the internal wiring. Loose connections on the power cord cause failures and or fires. This can be checked with the dryer unplugged and removing the service cover and visually check for burning and mechanically check for tightness.
If the circuit breaker trips or the fuse blows when the dryer is unplugged, it's likely the problem is with the house wiring, fuse box, or circuit box. Contact a qualified electrician.
 The main wiring connection from the house, at the dryer, burns and the connection breaks. If this has happened to your dryer. This often happens because of a loose connection at the dryer power cord. To check the electric dryer wiring unplug the dryer. Pull dryer from wall.
Remove the access cover on the back. This is where the dryer cord enters the dryer. Look at the connections. If they are burnt you need to replace the power cord (follow link for video) and the terminal block inside the dryer to which the wire is attached. If they are not burnt check for tightness and reinstall. This often happens because of a loose connection at the dryer power cord. To check the electric dryer wiring unplug the dryer.