There can be several causes for your dishwasher to be stuck in a cycle. I would check them in the following order below. First if your dishwasher is still stuck in wash, drain, or fill cycle shut off the breaker for 5 minutes. The breaker is in your homes electrical panel box. This should reset it. Now if you reset the dishwasher and try to use again and it still gets stuck in cycle check the following.
When the dishwasher fills, the dishwasher heating element located at the bottom of your dishwasher under the bottom rack. Heats the water to a temperature that the thermostat reads and sends a signal to the main control to tell it to advance to the next cycle. I f the dishwasher heating element fails or fails to get the water to temperature, the thermostat never gets the signal to send to the control to advance.
 To Check the dishwasher Heater Element first a good visual check. Look for burn marks or breaks in the coating this would indicate you need a new dishwasher heating element.
To test with a multi meter Shut off the Main Breaker (video on using a multimeter)
On most dishwashers you can test the dishwasher heater element while the machine is in place. If yours, you cannot follow
this video on removing a dishwasher.
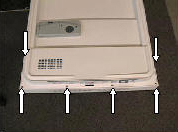
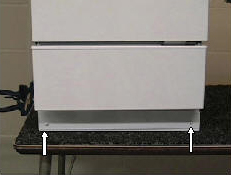 Remove the lower kick panel cover. The lower kick panel cover is located a t the bottom of the dishwasher. There
are usually 2 screws holding it in place. One on either side. It may be a 2-piece cover and have insulation
attached to the back. Remove the screws and set cover aside.
Remove the lower kick panel cover. The lower kick panel cover is located a t the bottom of the dishwasher. There
are usually 2 screws holding it in place. One on either side. It may be a 2-piece cover and have insulation
attached to the back. Remove the screws and set cover aside.
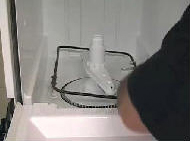
Next look inside your dishwasher for the location of wear the water heater element protrudes down into the bottom of the dishwasher. Now from underneath remove the wires connected to the dishwasher heater element. Set your multi meter to ohms (video of using a multimeter). Set to x1 scale or the lowest setting. Put one lead on each terminal. You should get a reading between 10-50 if not your dishwasher heater element has failed, and you will need to replace.
 To replace the dishwasher heater element is usually very easy. At this point you should have the kick panel
removed, wires disconnected, and inside rack removed and the power off. Now from underneath where you just removed the wires you will see the plastic nuts holding the dishwasher heater element in place. Use a crescent wrench to remove them. Sometimes the dishwasher must be removed to access this. (this video will help with removing a dishwasher).
To replace the dishwasher heater element is usually very easy. At this point you should have the kick panel
removed, wires disconnected, and inside rack removed and the power off. Now from underneath where you just removed the wires you will see the plastic nuts holding the dishwasher heater element in place. Use a crescent wrench to remove them. Sometimes the dishwasher must be removed to access this. (this video will help with removing a dishwasher).
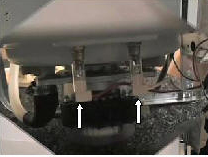
 Now that the 2 nuts are removed use 2 hands and gently grab the dishwasher heater elements by the sides and pull
up to remove. There may be a clip securing the element and it can be popped out with your fingers. Now clean the surface and install the new element in the same place. Secure in the clip and install the 2 plastic nuts.
Now that the 2 nuts are removed use 2 hands and gently grab the dishwasher heater elements by the sides and pull
up to remove. There may be a clip securing the element and it can be popped out with your fingers. Now clean the surface and install the new element in the same place. Secure in the clip and install the 2 plastic nuts.
Connect wires. Check for leaks before installing lower kick panel.
The Hi Limit Thermostat can be accessed from under your dish washer on most models. Removal of dish washer may be necessary in some cases. (This video will help with removing a dishwasher).
First remove the bottom kick panel cover. To remove the lower kick panel cover. The lower kick panel cover is located a t the bottom of the dishwasher. There are usually 2 screws holding it in place. One on either side. It may be a 2-piece cover and have insulation attached to the back. Remove the screws and set cover aside.
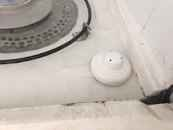
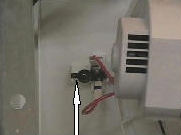 The Hi Limit Thermostat may be round or rectangular depends on the model. The Hi Limit Thermostat is usually located underneath the dishwasher.
Now that you located the Thermostat disconnect the wires. Set your multimeter to ohms (Video on how to use a multimeter). Now set it to x1 scale or the lowest setting. Connect one lead to each side of the thermostat. You should have a reading if you have no reading or continuity you need to replace the thermostat. This is very easy remove the two screws holding it in. Put your new Hi Limit Thermostat in place tighten screws and reconnect the wires.
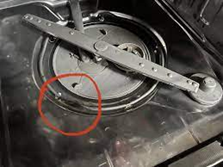
Your float level switch is located inside of the bottom of your dishwasher. The float level switch lets your dishwasher control know when it reaches the proper water level. If the dishwasher float level switch fails or get debris in it, it can cause over or under filling problems. The dishwasher may also get stuck in a cycle or overflow.
Next locate the float level switch, and check for debris under it then grab it and gently lift up and down about an ½” you should hear the relay make a click noise. If you hear no noise your float switch is probably bad and will need to be replaced. To double check with a multimeter, you will need to remove the lower kick panel (video on how to use a multimeter)
 To remove/check the float level switch you will need to first remove the kick panel. To remove the lower kick panel cover. The lower kick panel cover is located a t the bottom of the dishwasher. There are usually 2 screws holding it in place. One on either side. It may be a 2-piece cover and have insulation attached to the back.
Remove the screws and set cover aside.
Locate where the float/level switch protrudes down thru the bottom of the dishwasher. Now remove the wires. Set your multimeter to ohms. Video on how to use a multimeter. Now set it to x1 scale or the lowest setting. Connect one lead to each side of the thermostat. You should have no reading. Reach into the dishwasher and pickup on the float and you should have a reading. If it does not pass replace the float level switch.
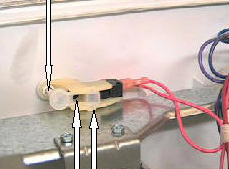 To remove get a flathead screwdriver. Pry the 2 tabs slightly and swing the cover off. Notice the position of the small actuator. This pushes the float up and down and activates the switch. The switch will now come out of the housing. Place the new switch in its place carefully setting the actuator in position. Reinstall the wires and kick panel and your done.
If all the above did not fix your dishwasher the main control may be bad. The control board is easy to check and replace.easy to replace.
To check the main control shut off the main breaker.
 Next remove the front panel or control cover. This is usually located on the door. There should be six screws
inside door edge holding cover on.
Next remove the front panel or control cover. This is usually located on the door. There should be six screws
inside door edge holding cover on.
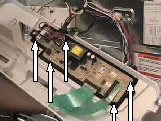
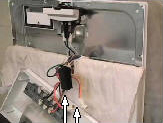
Locate the main control and photo all connecters. Pry the tabs or remove screws to the main control cover.
Inspect the circuit board for any burn marks or electrical smells. If you see any the control is bad. If not usually located behind the door or under the machine will be a wiring diagram. Refer to this to find the two power leads coming into the control. Usually these wires are white, black, red, or green. Set your multimeter to AC 120 volts (video
on using a multimeter). Restore power and connect leads to incoming power. You should have 120 volts. Now you have confirmed incoming power is good, now check power to the drain pump. Locate the wires from the wiring diagram. Connect your leads. Start the cycle and you should have 120 volts of power to the drain pump, if not replace the control board.
 To replace the control board, remove the screws holding it in place. Put the new control board in its place. Reinstall the screws, wire connectors and cover. Install front panel or control cover and turn power back on.